

The easiest way to tuck a graphic tee is to start with a small front tuck: slide two to four inches of the front hem into your waistband, then let the sides fall naturally. It defines the waist without hiding much of the design. A full tuck looks cleaner, while a side tuck or fold-under finish keeps the outfit relaxed.
The right method depends on the shirt’s length, the rise and structure of your bottoms, and how much of the graphic you want visible. Start with less fabric than you think you need; you can always tuck more.
Graphic tee tucks at a glance
| Method | Works well with | Overall effect |
|---|---|---|
| Front tuck | Jeans, shorts, casual skirts | Relaxed with light waist definition |
| Full tuck | High-rise jeans, trousers, structured skirts | Neat and balanced |
| Side tuck | Asymmetrical or casual outfits | Easy and slightly undone |
| Loose tuck | Softer tees and roomier waistbands | Bloused rather than fitted |
| Fold-under tuck | Bulky waistbands or short torsos | Cropped effect without a knot |
1. Use a front tuck for the easiest everyday option
Pinch a small section of the hem at the center front and tuck it just behind the waistband. Smooth the fabric only enough to remove a large bunch, leaving the sides and back untucked. This method works especially well when the graphic sits high enough that the waistband will not cover its lower details.
For a balanced result, keep the tuck narrower than the front pockets of your jeans. If the tee is long, fold the tucked section once before placing it inside the waistband rather than pushing a large amount of fabric into one spot.
2. Choose a full tuck for a cleaner silhouette
Tuck the entire hem evenly around your waist, fasten the bottoms, then raise your arms once to release a little fabric. That small amount of ease helps the tee sit naturally instead of pulling tightly across the chest or graphic.
A full tuck is useful with high-rise jeans, trousers, and skirts when you want the waistband to become part of the outfit. Check the design in a mirror after tucking: if the lowest line of artwork disappears, loosen the tee or choose a lower rise.
3. Try a side tuck for a casual asymmetrical look
Move the tucked section a few inches to one side, usually near a front belt loop. Keep the opposite side loose. A side tuck creates a diagonal line across the hem and can feel less formal than a centered front tuck.
This method is helpful when a centered tuck lands directly beneath the main graphic. By shifting the tucked fabric, you can preserve more of the design while still giving the outfit some shape.
4. Make a loose tuck instead of packing in extra fabric
For a longer or roomier tee, tuck the hem all the way around and then gently pull out one to two inches of fabric. Distribute that ease around the waist rather than creating one large fold. The result should look softly bloused, not ballooned.
If the waistband already feels snug, skip this method. Too much fabric can create pressure and wrinkles, especially beneath a belt. A front tuck will usually be more comfortable and visually lighter.
5. Use a fold-under tuck when you want less bulk
Fold the bottom hem inward toward the body and secure only a small section beneath the waistband. This creates the impression of a shorter tee without tying a knot through the artwork. It is especially useful when the hem is long but the fabric feels too bulky for a full tuck.
Keep the fold below the printed area and avoid stretching the shirt to force a shorter length. If the fold slips, use a narrower section or return to a simple front tuck.
How to keep the graphic visible
- Check the artwork placement first. Designs extending close to the hem need a smaller tuck.
- Match the tuck to the rise. A high waistband covers more fabric than a mid-rise waistband.
- Avoid twisting the printed area. Gather plain fabric below or beside the design instead.
- Do a seated check. Sit down and confirm the waistband does not pull or sharply crease the print.
- Let the shirt’s shape guide you. A fitted tee may need only a narrow tuck, while a relaxed tee can handle a looser finish.
If the shirt feels too tight or too long before styling, review our practical guide to how a graphic tee should fit. The proportions of the tee matter more than forcing a particular tuck.
Three GeekCove tees to style with these methods
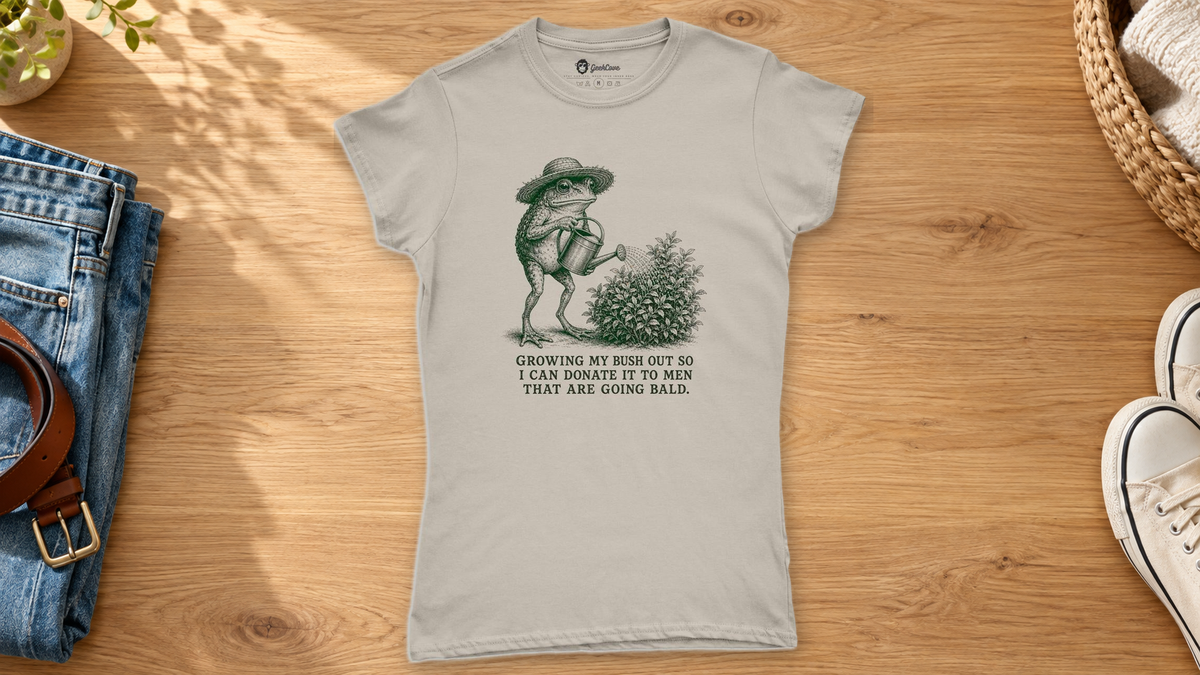
The sand Growing My Bush Out funny frog crew-neck tee uses centered artwork and stacked wording, making a narrow front or side tuck the safest way to keep the full joke readable. Its neutral color also pairs naturally with blue denim.
The I Like It Here V-neck tee is available in several colors and features a beach scene placed across the front. Start with a subtle side tuck so the lowest part of the scene remains visible.
For another coastal option, the Happiness Short Sleeve Crusher Vee comes in violet and teal. Pair it with a small front tuck and casual shorts or jeans rather than gathering fabric through the printed area.
You can browse more silhouettes and designs in the women’s graphic tees and tanks collection.
Build the rest of the outfit
Once the hem sits the way you want, keep the remaining choices simple. Jeans and sneakers make the front tuck feel casual; trousers and a belt make a full tuck more polished; a skirt works with either depending on its waistband and volume.
For complete outfit formulas, see how to style a graphic tee with jeans and how to style a graphic tee with a skirt.
Quick tuck checklist
- The artwork is fully readable.
- The waistband does not feel overfilled.
- The fabric can move when you sit and raise your arms.
- The tuck looks intentional from the front and side.
- No sharp fold runs through the printed design.
Start with the narrow front tuck, check the graphic, and adjust from there. The best tuck is the one that keeps the tee comfortable and lets its artwork remain the focus.


